Shoretel Communicator for Windows Guide
This guide is taken from the ShoreTel Communicator 14.2 for Windows Help PDF and reproduced in parts as necessary for South Whidbey School District's needs. Find the complete manual at the bottom of this page.
You can customize the ShoreTel Communicator user interface by specifying the:
- Language used.
- Background color of ShoreTel Communicator windows and panels.
- Amount of time ShoreTel Communicator is idle before being hidden.
- Keyboard focus when ShoreTel Communicator becomes active.
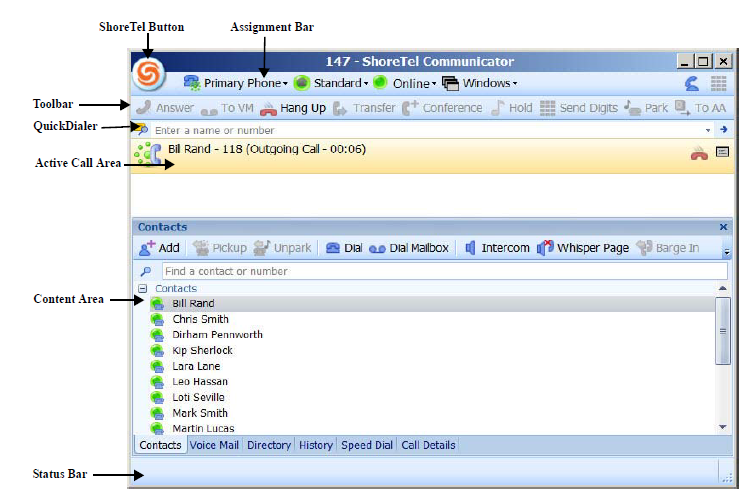
The ShoreTel Communicator Window
ShoreTel Button

The ShoreTel button appears as the ShoreTel logo in the upper left corner of the ShoreTel Communicator window. Clicking on the ShoreTel button displays commands for the most common features and to access online Help.
The Assignment Bar
The Assignment bar allows you to assign your primary phone, call handling mode, IM presence and connection status, and choose the ShoreTel Communicator windows you want to see.

The Assignment bar also displays icons, on the right side of the bar, that indicate the state of your current calls and voice mail, and if there is any trouble (errors) with your phone. These icons are:
 Indicates the current call and on-hook phone status, and displays the quantity of unanswered calls.
 Shows the number of new voice mails.
 The mute status of the current call.
 Opens a keypad through which dialing tones (DTMF) can be sent during active voice calls
Toolbars
Toolbars provide single-click access to ShoreTel Communicator tasks.

QuickDialer
The QuickDialer offers rapid access to directories and Outlook contacts, from which you can make a phone call, start an IM session, or send an email.
The QuickDialer can be customized by:
- Including fax numbers for contacts.
- Searching by company name.
- Displaying available methods of contacting filtered extensions.
- Showing a Go arrow on the right of the QuickDialer field. Clicking the Go arrow initiates a call to the contact in the field.
- Specifying the type of recently made and received calls displayed from the Redial icon.
Accessing a contact using the QuickDialer
- From the QuickDialer field drop-down menu, choose from the list of recent contacts.
- To find a contact that you have not recently been in touch with, enter information on the contact in the QuickDialer field; matches from the directory are displayed as the text is entered.
The following information can be entered in the QuickDialer field to find a contact:- The recipient’s name, as listed in your directory.
- The recipient’s number, as listed in your directory.
- A valid phone number, as specified by your system.
- Address.
- IM address.
- From the list, select method you want to use to contact the recipient.
Active Call Area
The Active Call area displays a list of your active calls in the order they are made and received. If you have more than one active call, new calls are added to the bottom of the list.
Information on a call includes the caller’s name and phone number, and the current status of the call. Icons provide a visual indication of call status. The call status icons, shown to the left of the caller details, are:
 Incoming Call
 Connected
 Hold
Hold Secure
Icons to the right of caller details allow you to manage calls from the Active Call area, as explained in Chapter 2, Making and Managing Calls on page 21.
You can customize the Active Call area by:
- Specifying the number of calls that can be handled by ShoreTel Communicator and listed in the Active Call area. Calls that you receive while the Active Call area is full are handled as busy.
- Displaying empty call cells.
Content Area and Content Windows
The Content area displays ShoreTel Communicator content windows. By default, only the Contents, Voice Mail, and History windows are available. To open the other windows, from the Windows menu choose the window you want to open.
The ShoreTel Communicator content windows are:
- Call Details
- Contacts
- History
- Voice Mail
- Directory
- Speed Dial
You can easily move between ShoreTel Communicator content windows by clicking the appropriate tab at the bottom of the Content area. Content windows can also be displayed in a separate standalone window. Refer to Displaying Separate Content Windows on page 18 for details.
Customizations
Configuring Phones
Before you can use ShoreTel features such as Extension Assignment, Ring Additional Phones, or Find
Me, you need to first configure the phone you want to use with those features. Configuring a phone
involves identifying the phone number to the system, and then specifying how incoming calls to that
phone are routed.
Identifying a Phone Number
If you want to route your call a phone number other than your primary phone or SoftPhone, you need
to identify that phone in the ShoreTel system.
- From the Options and Preferences window, click My Phones.
The My Phones page is displayed. - If the phone you are configuring is your mobile or home phone, enter the phone number in the field associated with that type of phone. Otherwise, enter a name for that phone in a Label field and enter the phone number in the associated field.
You can find a specific phone number by entering information in the field; matches from the directory are displayed as the text is entered. Select the number you want. If you want to change the number of times the phone rings before being sent to voice mail, and the number you press to answer a call, click the
 button associated with that specific phone. Use the Advance Phone Settings dialog box to specify the settings you want and then click OK.
By default, configured phones are set to ring 3 times before being sent to voice mail, and to be answered by pressing 1.
For extensions and mobile phones the Press 1 to answer calls option is not available.
- Click OK.
Specifying Incoming Call Routing
Once a phone has been identified, you can specify how incoming calls to that phone are routed.
- From the Options and Preferences window, click Incoming Call Routing.
The Incoming Call Routing page is displayed. - From the Incoming calls ring drop-down menu, choose the configured phone for which you want to identify incoming call routing. This is also the phone to which your extension is, or will be, assigned.
- In the Ring Additional Phones area, select the call handling mode(s) for which you want additional phones to ring simultaneously. Then choose the configured phone(s) that you want to ring.
- Use the options in the Find Me area to specify if you want callers who are routed to your voice mailbox to be able to contact you. These options are
- When callers reach my voice mail and my Call Handling Mode is. Select the call handling mode(s) for which callers can reach you.
- Find me at the following phones. Specify the first and second phones, in order, to which the call is routed. These can be internal extensions or external phones.
- You can find a specific phone number by entering information in the field; matches from the directory are displayed as the text is entered. Select the number you want.
- Send incoming Caller ID. Select if you want the incoming caller’s ID sent to the Find Me destination. The caller ID is displayed before you answer the call.
- Enable record caller’s name for Find Me. Select to prompt the caller to record their name for calls routed to the Find Me destination. The caller’s name is then played before you answer the call. You can then select Record name even if caller ID is present to require all callers to record their name, regardless of the availability of their Caller ID. This excludes internal users whose name was previously recorded.
- Automatically find me before playing my greeting, instead of caller pressing “1” during greeting. Select to route calls to the Find Me destination without requiring the caller to press 1.
- Click OK.
Configuring Call Handling Modes
A call handling mode determines the manner that your inbound calls are handled in a variety of situations. ShoreTel provides five call handling modes: Standard, In a Meeting, Out of Office, Extended Absence, and Custom.
You configure whether you want warnings about how the Standard call handling mode is being used when starting up ShoreTel Communicator, which users can change your call handling mode, and the definition of each call handling mode. This definition can include a recorded greeting and specifies how to handle call forwarding in various situations.
- From the Options and Preferences window, click Call Handling Mode.
The Call Handling Mode page is displayed. - If you want to change your current call handling mode, choose the mode from the Current call handling mode drop-down window.
- Select the appropriate options if you want warnings about how the Standard call handling mode is being used when starting up ShoreTel Communicator. These options are
- Warn when not using Standard Call Handling Mode. A warning is displayed if the active call handling mode is not Standard.
- Warn when Standard Call Handling Mode is set to Forward Always. A warning is displayed if the active call handling mode is Standard, and the option Forward Calls is set to Always.
- If you want to allow another system user to change your current call handling mode, use the Allow these users to change current call handling mode field to find and choose the user. Then click Add. The user is added to a list in the field below.
You find a user by entering information on the user in the field; matches from the directory are displayed as the text is entered.
To remove a user from the list of those that can change your current call handling mode, select the user in the list and click Remove, and then click Apply. - To change the definition of a call handling mode, select the mode in the Options and Preferences window navigation list. Using the page for that call handling mode, select the appropriate options and then click OK. These options are
- Record greeting. Click to record a greeting that callers hear when they reach your voice mailbox. Use the Record bar to record your message by clicking the Record button, and speaking into your telephone handset or headset. When done, click Stop. Use the Play button and cursor to review the recording. When satisfied with the recording, click OK.
You can have a different recorded greeting for each call handling mode.
Specifying Voice Mail Options
Using voice mail options, you can specify how your voice mail is recorded and played, delivered, and escalated. In addition, you can record a new message and change your voice mail password.
You can specify the sound that is played when a new voice mail is received on the Options and Preferences > Sounds page. For more information, see Choosing Sounds on page 96. You can specify the language used for voice mail audio prompts on the Options and Preferences > Language page. For more information, see Identifying the Language to Be Used on page 97.
Specifying Voice Mail Options
- From the Options and Preferences window, click Voice Mail.
- Using the Voice Mail page, select the appropriate options and then click Apply.
These options are:- Play messages using PC speakers. Plays voice mail through your computer speakers instead of your phone.
- Record messages using PC microphone. Records voice mail through a microphone that accesses your computer’s sound card.
- Play envelope information when listening to messages. Plays sender and receipt time information prior to listening to a voice mail.
- Change Password. Click to change the password that protects access to your voice mail.
- Record Name. Click to change the recording of your name played to callers when they are routed to your voice mail.
- Notification delivery options. Specifies the media the system uses to inform you of the receipt of a voice mail. The delivery options are:
- Disabled. Notification is disabled.
- Email Wave file. A copy of the voice mail, attached as a WAVE file, is sent to the specified email address.
- Email notification. An email message indicating the receipt of a voice message is sent to the specified email address.
- Mark delivered voice mail as Heard. The notification indicates that the voice mail has been heard.
- Deliver to email address. The email address to which notifications are to be sent.
- To define how notifications for new or unheard voice mail is escalated, click Escalation in the Options and Preferences window navigation list.
- Using the Escalation page, select the appropriate notification option. These options are:
- Notify for first unheard message. Begins escalating voice mail one at a time. The system stops escalating a voice mail when it is marked Heard.
- Notify for each new message. Escalates each voice mail, allowing for concurrent escalations.
- The active call handling mode determines which escalation notification profile is used. If you want to define or modify an escalation notification profile, select the profile in the list and click Edit. Use the Escalation Notification Profile dialog box options to specify the profile’s definition. Then click OK.
A profile definition includes the following options and can have up to 10 individual steps:- Profile Name. The name of the profile.
- Repeat Count. The number of times the escalation is repeated. Escalation is also discontinued when the voice mail is marked as Heard.
- Timeout. The amount of time, in minutes, that the specified phone will ring with an escalated voice mail before the system sends a notification message.
- Notify me of urgent messages only. Only voice mails marked Urgent are escalated. ShoreTel allows callers to mark a voice mail as urgent after recording the message.
- Email Notification Options. The media and email address the system uses to send an escalated voice mail. The delivery options are
- Disabled. Notification is disabled.
- Email Wave file. A copy of the voice mail, attached as a WAVE file, is sent to the specified email address.
- Email notification. An email message indicating the receipt of a voice message is sent to the specified email address.
- Telephone Notification Options. The phone or pager number the system uses to send an escalated voice mail.
- You can delete an escalation profile by selecting it in the list on the Escalation page and clicking Delete.
- Click OK.
Related articles
-
Page:
-
Page:
-
Page:
-
Page:
-
Page: